Last Updated on March 6, 2026 by Audrey
This post contains affiliate links.
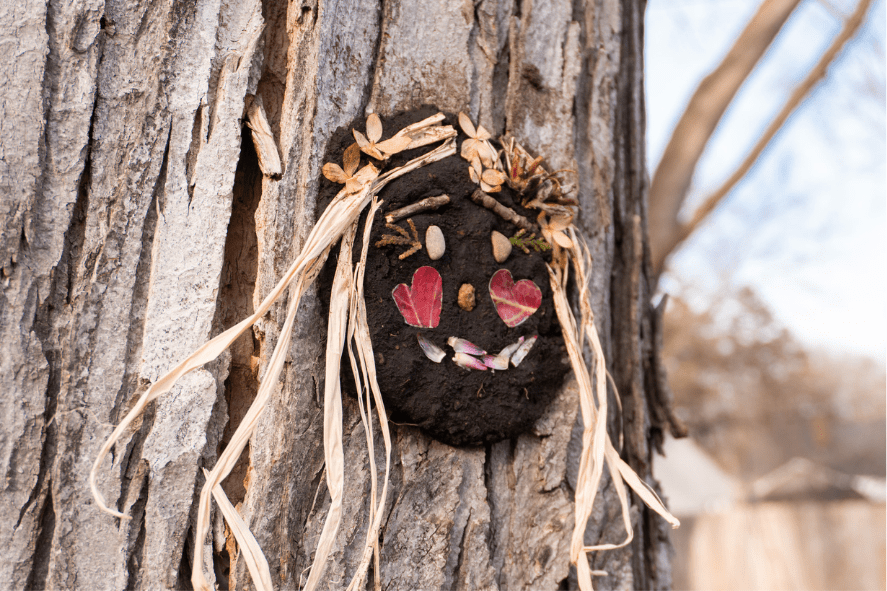
Mud play is one of our favorite things to do in the springtime! If given the chance, all kids are instinctively good at mud pies. Maybe you’ve even seen some of the awesome mud kitchen ideas floating around. This week, we were looking for something a little bit different to do with our mud. So we created these hilarious mud faces on one of our trees!

My little guy had already been playing with mud for a couple hours. I could tell he was on the verge of suggesting we go inside and needed a new idea. He was instantly intrigued when I took one of our mud pies, slapped it on a tree, and started sticking things onto it. Boom! Another few hours of entertainment right there.
It was so fun to watch him make theses and see how the faces came out! And, of course, I couldn’t resist making a few myself. If you and your littles are in need of some new mud play ideas (or outdoor play ideas in general), here’s how we made these!
Make mud!
The first thing you need is obviously mud. We have quite a few bare patches of dirt in our backyard that I’ve been letting the little guy dig in. Maybe I’ll regret it someday when I actually want to start planting grass seed. But for now, it works! We also have an old garden bed for digging up some good dirt.

Then it’s time to add water! Mixing the dirt and water to get just the right consistency of mud is where it starts to get really fun (and messy)! You want it to be just firm enough to hold its shape, but not so gloppy that it slides off the tree after you slap it on.
If there isn’t dirt in your yard and you’re not a fan of the kids digging up the lawn, you can always just purchase some clay like this. Once you’ve got your mud or clay, it’s time to gather some nature bits for decorating.
Gather some nature materials for your mud play!
We walked around the yard and collected whatever we could find. We don’t have an abundance of stuff that’s blooming or growing yet, but we were still able to find enough for faces. You can always purchase some items as well or rummage around in your craft drawers! Here are some ideas to get you started:
- Pebbles
- Evergreen clippings
- Grass
- Leaves
- Shapes cut of of leaves with shaped hole punches
- Nut shells
- Flowers/petals (Fresh or pressed)
- Helicopter seedlings
- Small pinecones
- Wood slabs
- Twigs
- Acorns
- Feathers
- Moss

Make your faces!
Once you have all of your nature materials collected, make your mud pies! Make sure the consistency is firm enough to shape the mud but wet enough to stick to the tree and hold all of your nature pieces. Take your mud pies and slap them onto a tree!
Now it’s time to start making the faces! Let your kids get creative and see what they come up with! I have to admit that I also had fun doing this myself 😀 And I also couldn’t believe how long this simple idea entertained us. Isn’t mud play the best?

During our mud play, we had fun putting these faces on trees in our front yard to look out on the road in addition to one that stared right into our dining room window that we could see every time we ate. Depending on how much rain you get and the consistency of your mud, these have the potential to last a really long time!

I hope you have as much fun making these faces as we did! If you want even more mud play ideas, check out more awesome ideas here!
If you want to provide even more opportunities for your kids to play in the mud, check out how you can create your own mud kitchen space!
PS – Know someone that would like this blog? Please forward it to them!


